Before You Start
Please ensure you have created your FastVirtual account and added either
Dial-Up Access
or Accelerated
Dial-Up Access to your active services.
Use the Access Number Lookup Tool
to find your local dial-up access number. You will need this together
with your username and password to successfully configure your connection.
Note: For optimal performance, your modem should be using the
latest drivers. For more information, please see
this FAQ.

Mac OS X Configuration
Follow these steps to add/edit your dial-up connection:
- Add or select the location (connection)
- Select or confirm the connection type
- Configure or confirm your connection settings
Accessing Network Settings
Select "Apple", "Location" and "Network Preferences" to access the
Network Status screen.
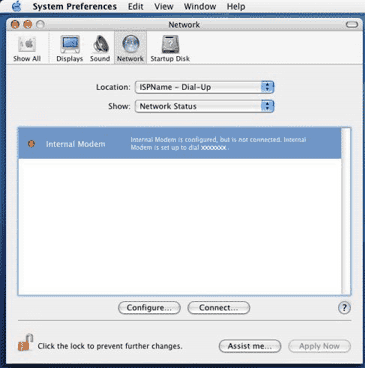
Step 1: Add or select the location
The "Location" menu shows all the locations that have been
configured on your computer. The options and settings under the "Location" menu
relate to the location that is currently selected.
To add a new location, click the arrows on the Location menu,
select "New Location", provide a name for the location and click
"Done". Make sure your new location is selected in the "Location"
menu.
If you wish to edit an existing location, make sure the correct
location is selected in the "Location" menu. If not, click the arrows
on the Location menu to display all your locations, and select the
location you wish to edit.
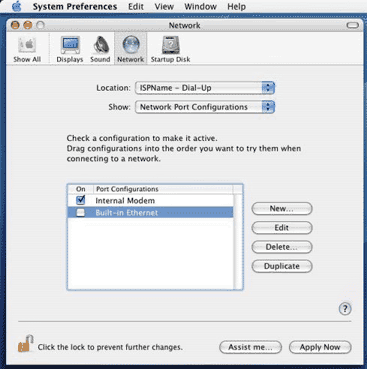
Step 2: Select or confirm the connection type
The "Show" menu displays all connection types available on your
computer. Click the arrows on the "Show" menu and select "Network Port
Configurations". Only "Internal Modem" should be checked. Remove all
other check marks and click "Apply Now".
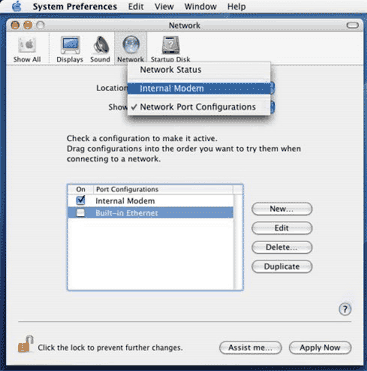
Click the arrows on the "Show" menu and select "Internal Modem" to
return to the connection screen.
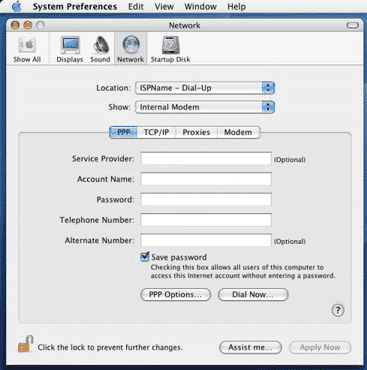
Step 3: Configure or confirm your connection settings
Click the "TCP/IP" tab and make sure "Using PPP" is selected. If
not, click the arrows in the "Configure" menu and select "Using PPP".
The "IP Address", "Subnet Mask" and "Search Domains" fields can be left blank.
Click the "PPP" tab and enter a name in the "Service Provider"
field, i.e. FastVirtual". Enter your FastVirtual username in the
"Account Name" field, and your password in the "Password" field.
Please remember that passwords are case sensitive, so "Password" is
not the same as "password".
Enter your local dial-up access
number in the "Telephone Number" field. You may also enter an
alternate number (if available for your area). If your area requires
10 digit dialing, precede the access number with the area code. For 11
digit dialing, precede this with a "1". Enter enter a preceding "9" if
this is required to access an outside line. You can also disable call
waiting by entering "*70".
Click the "PPP Options" button to configure your session options.
You may configure these as you wish. Advanced options should be left
at their default settings.
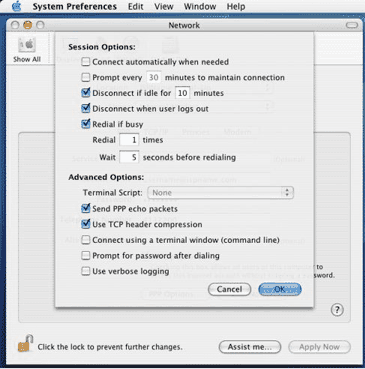
Note: "Connect automatically when needed" will dial your
connection whenever you launch an application that requires an
Internet connection, such as your web browser. However, dial-up
connections take some time to establish a connection, so you may find
that your web browser times out before the connection is established.
In this instance, simply refresh your browser once the connection has
been established. Alternatively, always manually establish your
connection before launching Internet-dependent applications.
Click the "OK" button to save your changes and close the window.
Click the "Modem" tab and make sure the correct modem is selected,
i.e. "Apple 56K Modem (v90)". "Enable error correction and compression
in modem" and "Wait for dial tone before dialing" should both be
checked. "Tone" dialing should almost always be selected, unless you
have a specific requirement for pulse dialing. "Sound" and "Show modem
status in menu bar" can be set to your preference, although these are
both useful options for monitoring your connection.
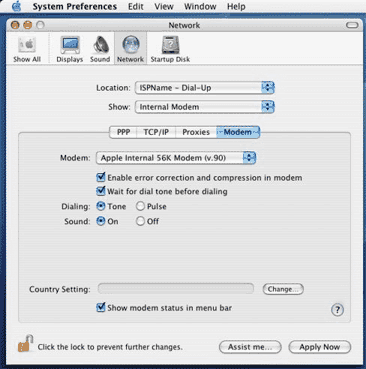
Click "Apply Now", close all windows, and you have finished
configuring your connection.
|
